Showing posts with label Organizing. Show all posts

Thursday, August 15, 2013

A school room that isn't a school room

I thought for years that I couldn't homeschool without a dedicated homeschool room.  I had one for a while but then we had more kids and thought it best that they have a bedroom.

Finally we decided we would get a big cabinet from Ikea and just homeschool mostly in the dining room only we didn't want it to look too much like a school room so here is our solution:


Here is my super simple organization to make my son a tad more independent.  If I say - lets do math - he knows  which one to grab and it is all in there.  His Math U See manipulatives, his DVD and his workbook and a pencil.  I got them at Target for $4.99 each.


Here is what the shelving looks like all together.


And I put the maps up in the boys room.  We do have to walk from the dining room to the boys' room to do any map work but it doesn't take that long.


 There you have it.  Nothing too fancy.  Simple always works best for me. 


Friday, March 1, 2013

Drink Cup Tray - Saves on dishes!

Last year my sister-in-law sent me an idea from Pinterest and since I have so much time on my hands, I finally finished the project - a year later.

Here is the picture and post that I got the idea from:

From Bee in our Bonnet

 I decided to do mine slightly differently.


Do you want to make one?

Here are the things that you need:

Wood glue
Modge Podge
Paint of your choice
Stencils
Scrapbook paper (or card stock)
Cabinet handles
Wood board of your choice
Small pegs for the tray to stand on

Instructions:

Paint the board whatever color you choose, let dry.  Paint the "legs" the same color - allow to dry.  Cut squares from your scrapbook paper.  Lay the paper on the board (once the paint is dry) and use a ruler to make sure they are the same length apart.

Now, grab your Modge Podge and "paint" the back of the squares and stick them on and then paint the front of the squares along with the top of the board - allow to dry completely.  Once dry, put another coat on and allow that to dry.  Once that is dry stencil initials onto each square and you can put one more Modge Podge layer on that after the stencils are dry if you want.

Once everything is dry, use your wood glue and glue on the little spindles or pegs you got for your "legs".  Once that is somewhat dry, use your wood glue to put the handles on each side.  Let dry overnight and then use it everyday!


I have had to remind the kids to put their cups on it when they are done but they are getting more used to it.  This lets us keep one cup the whole day - just rinsing it and when the kids say - where's my drink I say, "Check the tray."

I love it!


 Where I bought everything:

The wood board itself I bought for $5.99 at Joann's.  I bought the pegs,scrapbook paper, black paintm Modge Podge and stencils there too.  I bought the wood glue and and handles at Lowe's.  It was all very inexpensive probably about less than $15 to make and some things like the glue, paint, Modge Podge and stencils I can use again!


Wednesday, August 22, 2012

E-mail your sponsor child


I just don't seem to have a lot of time these days to sit down and blog.  Its okay though.  Someday I will have time but right now I have little hands and feet to follow around and take care of and play with.  I won't always have that so I have to try to capture each moment.

I do want to let you know about something I read this weekend.  I sponsor a child through World Vision and if you sponsor a child you may want to know about this because I am awful at writing letters.  You can now email Your Sponsored Child and I think that is pretty exciting since it will be easier than sending a letter.

I still will write a hand written letter every once in a while but in the mean time I can keep in touch more often!  You can do this through Compassion too!

If you don't have a sponsored child - you can easily sign up for one through World Vision or Compassion International.  It is worth it!


Tuesday, May 8, 2012

My Best Tip Ever

I have started something in the last several months that has helped me a lot when it comes to house keeping.  It took a good few months to accomplish and we (my husband and I) had to be ruthless about it.  I promise if you do this - you will be living a simpler more enjoyable life.  I don't promise riches or anything like that but I can guarantee you will have more time to spend with your family or on things that you enjoy.

Do you want to know what it is?

Get ready . . .

My Best Tip Ever is . . .  Act like you are going to sell your house.


Seriously.

I mean we actually have our house up for sale so we had to do it for real.  You may not want to sell your house or you may live in an apartment but these things can and will work for you!


I will tell you what it does for you:

  1. You are able to open your closet doors and actually see things and get to them easily.
  2. Your kids can find the toys that they have and easily get them and play with them and put them back because there is a space for them.
  3. Dusting is not a problem because there are virtually no knick knacks and other dust collectors.
  4. Laundry is easier because (see #1) - you have room to put clothes away.
  5. Wiping down the bathrooms are easier because the counters are clear.
  6. Vacuuming takes less time because there isn't as much stuff on the floor.

I can tell you when I first started this process it was overwhelming.  I enlisted help.  My mom helped me clean out closets.  My stepmom and sister helped me decorate the walls and clean.  My husband rented us a storage unit and took lots of trips there.

Let me tell you why a storage might be a good idea for you.  It is money you are spending extra per month, but I think it will help you.  It will help you get things out of your house.  If you put them in storage and realize you can live quite well without them for at least 3-6 months then you know you can get rid of them.

These days since I have my menu planned and I shop by the pantry principle and I am training my kids to keep their things picked up and to help me clean - I really have a much more relaxed and happier home.  Often times getting a load of laundry done is all I have to do for the housework side of my job.

Again, I did not get to this place overnight and if we don't watch it, the house can get cluttered again, but this time I know how wonderful it is to live in a decluttered home and I won't go back.  I don't go to garage sales.  I don't go to the Goodwill.  I've stopped going shopping unless I have a specific list.  It is really freeing actually not to mention you spend less money - a great bonus!

It may sound daunting but just start small - with one closet or one drawer.

Give yourself a deadline - maybe 3 months down the road.  Enlist accountability partners to see you through.

If nothing else you will have the freedom and peace of mind that comes with having less stuff.  As my kids always say, "Try it, you'll like it."


Tuesday, March 13, 2012

Kitchen Tip Tuesday - Make Bread kits

I have been a bit lazy about making our bread since my "morning" sickness lasted about 2 to 3 months.  And now I am feeling so much better but I am trying to be more committed to this whole homeschooling thing and turns out - that takes up a LOT of time.  So I still want to make the bread we like.  I just wanted to make it easier.  Introducing the bread kits!


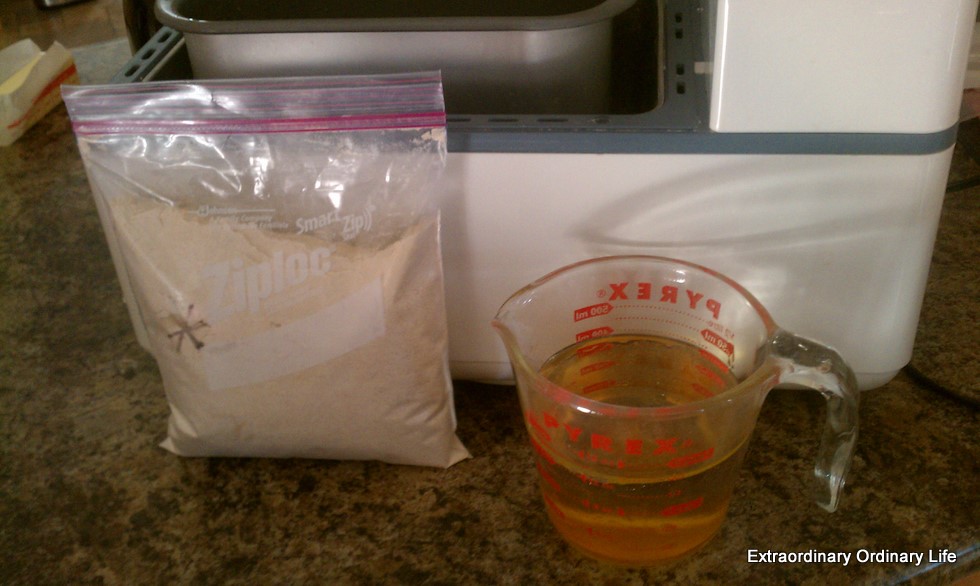
I take some time to grind a whole bunch of wheat and then I fill quart size Ziplock bags with the dry ingredient from the best whole wheat bread recipe that I have found.

Here is what each bag holds:

1 1/2 tsp Real Salt
3 1/2 C fresh whole wheat flour
2 tsp Dough Enhancer
3 TB Vital Wheat Gluten
1 1/2 tsp Saf Instant Yeast

I make sure to put the yeast in first because the instructions in my bread machine manual says to put the yeast in last so if I put in the bottom of the bag it comes out last.

When I am ready to make a loaf of bread here is all I have to do:


Fill up a measuring cup with 1 1/2 cups of lukewarm water, 2 Tbsp. of oil and 2 Tbsp. of honey.  I dump that in first then I dump in my bag and turn on my bread maker.  You can go here to see what I do after the dough is done because I always bake my bread in the oven and not in the bread maker.

It looks like this when it is done in the bread maker:


And then it looks like this when it is done baking:


I store these bags in the freezer because the freshly ground flour lasts better if it is frozen.  It really makes making homemade bread so much easier!


Raising Homemakers


tammy's recipes


Wednesday, February 8, 2012

Freezer Organization for almost every freezer type

I have been wanting to organize my freezers for a while.  I have several you see.  I have my regular freezer that goes with my side-by-side and then I have our "garage" refrigerator with a top freezer.  I also have an upright freezer and a small chest freezer.  It might be freezer overkill but since we buy meat in bulk and I like to do freezer cooking it works well for us.  I start by looking for inspiration and then from there I measured my shelves of each of my freezers and then I go and buy containers that I think will fit the space. 

I looked up some inspiration and found these:

This is from Amy's Finer Things:

And this is from Homestead Revival:

I used these as inspiration for how I wanted to organize my freezer.  I did go to Target and buy some containers.  The smaller baskets were $2.99 and the larger ones were $4.99 plus they are stackable.  I made up my own labels and printed them on cardstock and laminated them.  I used a whole punch and binder rings to attach the labels.

Labels

I put most of my bulk items in my upright freezer.  I put our pork, deer and the peaches and corn we froze last summer along with my bulk grains at the bottom and a small basket of chicken and beef stock that I have.

This is a before picture

This is after
My small chest freezer usually houses our bulk beef and chicken and is hard to organize because it is smaller and a little awkward.  I took everything out and did an inventory.  I hid the meat we don't use often under the basket with the corn on the cob.  I put the beef soup bones and oxtail in there.  I will use it to make broth at some point.  I put the whole chickens in the bottom and then used the smaller stackable baskets on top of the chickens.  One basket is ground beef, one is steaks and  the other is roasts.  It is about time to order some more beef.

Before (you can't really see anything)

After - not a lot to see but at least I know where everything is.

Finally, I organized our side-by-side freezer in the house.  I just used the baskets and put the items in categories such as vegetables, meals (stuff to make quick meals such as cooked meat and pizza dough), waffles and pancakes that I have made and frozen and other things.  The bottom bin holds some nuts and grains and other baking ingredients.

Before

After
Close up of the labels - I used velcro on these baskets


There you have it.  Freezer organization that I have needed to do for about 3 years now.  I won't tell you about some of the things that I found that I had to throw away but at least it is done and I am planning to maintain this better and keep up with what I have.


Raising Homemakers


MoneySavingMom.com


Sunday, January 29, 2012

Simplify with MIT's (Most Important Tasks)

Well, I had just come off of 8-10 weeks of "morning" sickness and some serious exhaustion and here I was feeling so much better and thinking we were on the upswing.  So much was going well and the week went great when out of no where my daughter threw up.  The first time in her four and a half years of life that she threw up.  And she didn't just do it once but several times throughout the night - so much for sleep.  Then just as we crossed that hurdle and thought all was well, a day and a half later my two and a half year old also threw up and that was the first time in his life too.

I will spare you the rest of the details but lets just say the whole family was better and then worse within the span of this past week.  I will say I have never felt that sick or been that still my whole life.  I will also say food just seems awful at this point and I have lost a good 5 lbs. in about a two day period.  So I should be posting my menu plan but I can't even think about that right now.

My point to telling you all this is that sometimes in life we do still need a plan but we must drastically alter that plan depending on the season.  I am a list maker and a planner, not by  nature, but by necessity because otherwise, nothing would get done around here.  I was doing the 10 goals along with Money Saving Mom but decided 10 was too ambitious at this point, that is when I ran across the book Organized Simplicity.  It was a free download for my Kindle App (on my Android phone).

She had a chapter in there that talked about her daily docket.  What really got me was how she organized her daily docket.  She limits herself to 10 things on her to-do list but then she takes her 3 top priorities for the day and those are her M.I.T.'s (most important tasks) - jackpot!  I can do that.  So I didn't have a printer at the time (my computer got a virus too - seriously, we were all sick, ha).  So I just wrote mine down on paper (gasp) and I made my three most important tasks.  And as you see on my paper, I did not cross off some things on my to-do list but all of my M.I.T.'s were crossed off (Sorry, MJ, I still need to send out your birthday present).

Someday, I may be back to getting it all done but as for today, I will just do the best I can with what I have and pray a lot.  I know that prayer works better than anything. 

And let us not grow weary while doing good, for in due season we shall reap if we do not lose heart.    Galatians 6:9

Tuesday, January 10, 2012

Two Things I am trying to be consistent about

Money Saving Mom had a little Q & A about keeping her kitchen counters cleared off and clean.  I read it a while back but it inspired me to take pretty much clean everything off of my counter and put it away.  This included my Kitchenaid mixer and you probably know how heavy those things are.

Even though my counters were pretty much cleared off it is still a constant battle to keep them that way!  My husband and I were talking about doing something to make life run smoother everyday.  He asked me what we could do to make that happen and as usual I had a list of about 100 things.


He wisely said name a couple things first.  So my top two items were to complete one load of laundry everyday - start to finish and to keep the kitchen counters cleaned after we went to bed so I woke up to a clean(er) kitchen.

I am making an effort to be consistent about these two things for at least a week and then hopefully for two and so on.

You would think that these things would be easy to accomplish but for me they are not.  I have to be intentional about putting the clean dishes away from the dishwasher so I can load it with the dirty ones.  For some reason putting away clean dishes and clean clothes are two of my most hated chores.  I don't know why.

Anyway, this is what I am doing.  It makes my day go so much more smoothly. 


What are you trying to be more consistent about this year (or this month or this week)?


Thursday, October 20, 2011

Real Life Simplified - Kids Clothes

Doing the kids' laundry is always such a dreaded chore for me. So many little clothes to hang up on little hangers.  I have tried all sorts of systems (just ask my husband).  I have tried hanging up everything and not having dressers and it worked but I just got  tired of hanging everything up and since my three children share one clothes closet (albeit a big one!) hanging everything up was not working.

So we changed things up.  Here is what I did - asked people for unused dressers sitting around their house.  I found one and I put it into the closet.  We have NO dressers in the bedrooms.  This was a tip I got from an organizational book I read a few years ago. 


Just threw this picture in because it was cute.
Step 1:  Go through all of the kids current clothes.  See how many pajamas they have.  I kept five pairs each and I think that is way plenty.  Next go through their clothes.  Ask yourself how many outfits can be made from these pieces?  I figured we needed 5-7 outfits plus a few grubbier outfits for play at home and a few (3-5) church outfits.  I try to keep neutral shirts to match with skirts or jeans to be worn to church or just whenever we go out so they do double duty.


Step 2:  Pack away clothes that are too big in tubs for next year.  Then grab a bag for the clothes you are getting rid of - pass them on or donate them.


Step 3:  Organize the rest.  I am nerdy so I made these clothes tags and I hang the kids clothes up behind the tags.


Step 4:  Follow through with your system.  I also label the drawers so the kids can put away folded items themselves.  We keep pajamas, socks, undies, etc. in the drawers.  I have my older son help hang up his clothes.   Just keep putting the clothes away where they should be and you will have a smooth laundry system.

Another thing we have been trying to do is having them put their pajamas under their pillows when they make their beds so they can re-wear them for a night or two.  This cuts down on the laundry as well.

I do want my kids to look nice but I am all for hand-me-downs.  We are fortunate enough to have a lot of clothes given to us (except for my older son) so we don't have to buy a lot of things.  Mostly we just supplement what was given to us.  When I go through the items (as I stated above) I keep a 3x5 card handy with each kid's name on it and write down what is missing - such as long sleeve white shirts or black shoes, etc.  I do this in the fall and in the spring.  Then I put it in my purse so I can look for those items when I am out.

Less clothes = less laundry = less space needed = happier mom


Printfriendly