Showing posts with label Preserving. Show all posts

Thursday, September 12, 2013

Homemade Onion Powder

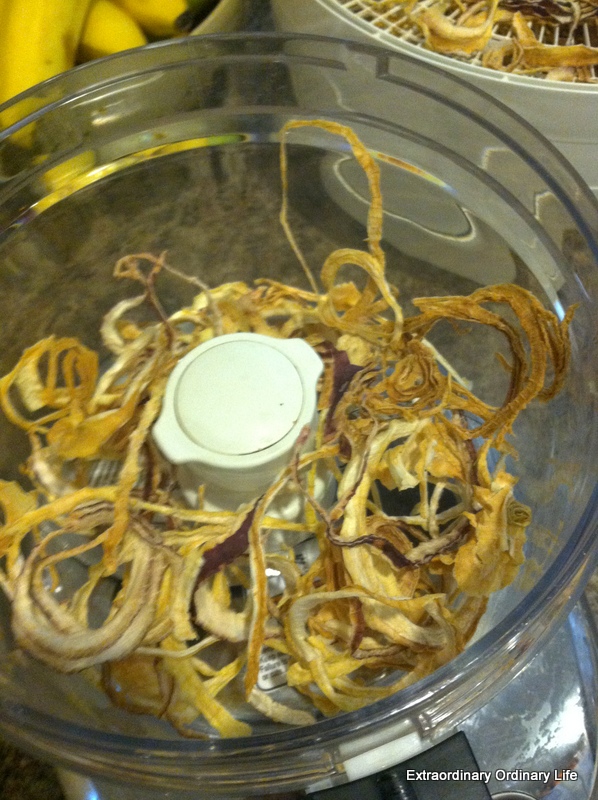
I had an abudance of onions.  I am lazy and don't always use real onions but I do use a lot of onion powder so I thought - I should totally dry these onions and make onion powder.

But the smell . . . was a tad overwhelming.

I thinly sliced many onions.  I had one red one in the bunch so the powder is a tish darker but whatever.


First I dried them on my $8 dehydrator that I bought at a garage sale years ago.


Then I put them in my food processor that my husband bought new a few years ago.  Are you loving knowing where I got all of my kitchen appliances from?


And I pressed the button that says "pulse".  I want to make sure you know exactly how to do this.


Until it was powdery, you know, for the powder.


Then I put it in the jar and labeled it onion powder because that is what it is.


 The end.


Thursday, July 25, 2013

What I'm usually doing in July

Freezing peaches - I canned them once and I probably won't.do.that.again.  I usually buy the "seconds" from a local orchard and freezer them.  Sometimes I make peach butter but now I'm making peach honey.


005


Canning green beans


I'm usually freezing corn (at least towards the end of July).  One year I even had a corn freezing party.  It was kind of crazy.


This year I froze blueberries too - towards the beginning of July.  I bought them from a local farmer who only uses vinegar as a weed killer and no other chemicals!


I try to buy as much as I can locally and freeze or can it to use for the winter.  I've been doing this for several years and I just can't seem to stop.  I also canned banana peppers too because I've recently discovered that I love them!

What have you been "putting up" for the winter?


Saturday, August 6, 2011

The Corn Freezing Party of 2011

Sometimes I have these grand ideas and occasionally these ideas I have actually come to fruition.  This crazy corn freezing party was one of them.  I gathered about 7 or 8 like-minded friends and decided to put together a "party" where we shuck and freeze corn.  I did this last year mostly by myself and it was not nearly as much fun as it was last night.

We all decided how much corn we wanted for each family.  If you want to try to figure up how much corn you need for a family for a year, see my post here.  I then totalled up the amount and called around to some farmers who sold produce at the farmer's market.  I finally ended up at a little stand not too far from my house.  He had his corn priced at $2 per dozen, but when I told him I wanted 80 dozen he actually said his corn wasn't as fresh and gave me the name of a farmer who I could get it from for $2.50 a dozen and it would be picked that morning.

We made the arrangements, and my long suffering husband and I took off to the farm in my dad's truck to get the corn.  We brought it back home and I got ready for the party.  I had thought we would all do the shucking, but it didn't quite work out that way.  So, we all took turns shucking. Several of us shucked way past dark.  And we have a motion light on our deck and so every few minutes we would have to get up and have a "dance party" as Heidi called it so that the light would come back on.  My husband told me later that there is a button on it that I could have pushed to keep it on, but the dance party was so much more fun.

Oh yes, Kelly loves to shuck corn

And here is Connie working diligently into the night.
And we can't forget the cleaning and desilking (although later we found out we could just boil them first and desilk them after they cooled because this was really fresh, clean corn).  Hindsight . . .

She looks happy, but it was the beginning of the night.
Here are the stations:

Station 1:  Boiling - We boiled the corn for 8 minutes and then immediately put the cobs into ice water.  
Miss Heidi boiled inside
I boiled outside
At the boiling station my husband set up
Station 2:  Cutting - This is where we cut the corn off of the cob. Pretty self explanatory.
 
 
Station 3:  Bagging - This is where we did the bagging, labeling and sealing the corn.  And yes, I had a white board to keep it all organized, or as organized as it could be.


And I'm nerdy like this, but I made labels for our corn.   You know, just in case you can't see that each see through bag is filled with . . . corn.

We did not get everything done, but we did get all 960 ears of corn shucked (give or take a few that people took home early unshucked).  All-in-all it was a GREAT night of fellowship with some wonderful Christian ladies.  I think next year we will get the corn a day in advance and each take home our own ears to shuck and then come together to process it.  We thought that would work better and faster. 

Oh yes, we are going to do it again.  I say corn shucking is like child birth.  It is worth the effort in the end and, like labor, once it is time to do it again, you have forgotten how painful it was.

Right?

Oh, and as for these girls, they were huge helps.  I mean look how tired they were after all the corn shucking.

They are Connie's twins

Corn, its whats for dinner.  Or at least its what is served with dinner.

Tuesday, July 26, 2011

How do you know how much to can or freeze?

I love to have sweet corn from the freezer in December, home canned green beans, homemade apple butter and so on and on, but I hate to run out of it come February so I have some tips to help you figure out how much you need for your family to last throughout the year.

Let's take green beans first:

  • Think about how much your family eats green beans.  Do you use one can a week or two?  When canning green beans you usually use quart jars because pints are too small.  So for a family of four a quart will feed you pretty well with some leftovers.  With a family of 6 (with small children), a quart will work but you probably won't have much left over. 
  • Now, saying that you eat one quart a week, you will want to figure how many weeks you will eat green beans when they are not in season.  Green bean season usually runs from mid-June to August in the midwest so you will want to have one quart of green beans for about 8 months which equals 32 weeks which equals 32 quarts.
  • Although, I would recommend canning a few more as you may want them for when you have guests and such.  Green beans usually come in bushels or half bushels.  Half bushels are about the size of a full 5 gallon bucket.   I have found that a 5 gallon bucket full of green beans will yield you 18 quarts of green beans.
  • So, if you want around 32 quarts to last you about a year - then you would need to can a bushel of green beans.  
Now onto corn:
  • I don't can corn, but I do freeze it.  Our family eats corn more frequently.  We eat about 1 bag of it a week and we put corn on the cob on the grill in the summer.  I put 4 cups of corn into each quart size freezer bag.  If you do eat a bag a week for approximately 40 weeks (when corn is not in season), then you would need 40 quart size bags for a family of 4-6.  If you think you will eat it on the cob in the summer (or any other time) then figure a cob each for each family member for about 10 weeks which would make 40-60 cobs.

  • Let's recap, for a family of 4-6, you would want 40 quart size bags of corn and 40 cobs.  You would want 3 dozen just for the cobs and then you would want another 15 dozen to make your 40 quart size bags.  These are approximate.  It could yield you a little more or less, but it is about the right amount.  If you get this much corn you can definitely negotiate a cheaper price per dozen.  I paid $2 per dozen last year (according to my notes).
Peaches:

For 100 lbs. of peaches (that my friend and I did last year) we got 23 quarts, 26 pints and 10 lbs. frozen in quart size bags.  If you wanted to eat peaches once or twice a week and have some for smoothies then I would recommend you freeze or can 50 lbs. to last you most of the year when peaches are not in season.  You can see my tips for how to freeze them here.


As far as berries go I find I never have enough.  I know it is a little late now to buy strawberries in season but you can still get blueberries in some places.  I just buy as much as I can to use in smoothies and to make jams and other things.  We like to buy strawberries and blueberries in bulk and freeze them.

From Ace Hardware


I bought this canning chart magnet to keep on my fridge so I can tell approximately how much I will need and how much it will yield.

More resources:

How about you?  What tips do you have to calculate how much to can or freeze for your family to last you until the fruits or vegetables are in season again?


Raising Homemakerstammy's recipes


Monday, July 18, 2011

Kitchen Tip Tuesday - Just Peachy

I have a small list of items that I now only buy once a year and this list includes green beans, corn, tomato sauce and peaches.  I buy these items in their peak and preserve them by either canning or freezing them in bulk.   Next week I will talk about how to figure out how much fresh produce to buy to preserve to last your family a year.
005
Today, I am going to tell you the easiest way to freeze peaches that I have found through two years of canning and freezing peaches.  First off, peaches are time consuming, especially if you have a lot to do.  The easiest way to preserve them is to freeze them.  I canned a bunch last year but this year I’m just freezing them because I love them just barely thawed from the freezer.

To peel the peaches:

  • Boil peaches for 30 seconds and then put them in cold water.
  • Cut off peach slices with a sharp knife.  *Note:  I have tried a lot of different ways of pitting peaches and there just aren’t any really good ways.  This is the hardest part.  You can cut the peach in half and try separating it and pit the peaches that way but that only really works if the peaches are harder.
  • The skin will usually slide right off, but if it doesn’t you can just freeze it with the skin on.  It won’t hurt you, and it still tastes good.

I drizzle the peach slices with honey and add a little lemon juice (2 tsp. or so per big bowl).    I then just dump several cups into a quart size freezer bag and lay it flat to squeeze out all the air out.  I lay the bags flat in the freezer to freeze.

peaches 1

To use:
  • Thaw on the counter about 20 minutes before you intend to eat them.  They are best eaten soon after they thaw.
  • You can use them in smoothies or make peach butter with them.
  • You can also make peach crisp or peach pie.
001


Tempt my Tummy TuesdaysRaising HomemakersBeauty and Bedlamtammy's recipes

Tuesday, July 27, 2010

Corn, Corn, Everywhere Corn


Who does not love Indiana Sweet Corn?  Really, who I need names?  Well, my family loves it and we especially love it in the winter when you can't find it anywhere except our freezer.  And this year our freezer is full of it.  I thought I would share with you the process to freezing lots of ears of corn.  I basically follow this tutorial with just a few things that I do differently.  Also, I found out that approximately 5 dozen ears of corn equals 16-17 quart size bags of kernels each holding 4 cups.

1.  Shuck your corn (involve your kids too - I offer a quarter per ear shucked).
2.  Wash your ears.  Not your ears the ears of corn, but you knew what I meant.  It is good to wash your ears as well but that would be a totally different post.  I also take a vegetable scrubber and scrub each ear to get more of the silk off.  Apparently there is this special brush that does that but I don't have one of those (would have been good to have probably).
3.  I clean all of the ears and pile them in my biggest bowls and pots.

4.  Once they are all clean I blanch them.  I do a lot at once so I use my pressure canner since it is huge.  I boil water and then drop the ears in and set my timer for 8 minutes.  The reason I use 8 minutes is that it takes the water about 2-3 minutes to come back to a boil and then I boil the ears for 5 minutes.
5.  I have 2-3 big pans/pots/bowls of ice water ready and I drop the blanched ears into the ice water.  Then I drain them in my colander that I have in my sink.  I filled up 4-5 quart sized zip top bags with water and froze them and I just keep rotating them in my blanching water.   I put them in and then when I am done I put them back in the freezer.  I use ice cubes too but I was going through ice way too quickly so this worked well.
6.  Once the ears are drained and cooled, I get to cutting the corn off of the cob.  I learned this trick on the internet last year.  Use a bundt pan to cut the cobs on.  The ears rest in the middle and the corn falls into the pan.  Then I dump the kernels into bigger bowls until I am ready to put them in the bags.  Oh and do your best to keep your kids out of the corn because they seem to want to eat it as fast as you are cutting it off the cob.


7.  Once the ears are cut off I label quart size freezer bags.  I put in 4 cups in each bag.  I fold down the top of the bag so I don't  get the closing part messy.  I lay them flat and take a straw and close up the bags until I get to the straw, and then I suck out all of the air using the straw and then I seal the rest of the way.  I lay them flat like that in the freezer.
8.  To use the corn, don't thaw.  I just dump the frozen corn in my microwave steamer and add a pat of butter and some salt and 1-2 tablespoons of water and  microwave for 5 minutes.  You could do about the same thing on the stove.

There you have it - delicious Indiana Sweet Corn!

For more kitchen tips, please visit Tammy's Recipes.


This post is listed at Blessed with GraceTempt my Tummy Tuesday and Balancing Beauty and BedlamTasty Tuesday.

Printfriendly